Did you know burnt food residue inside a microwave can linger for weeks if not cleaned properly? I’ve seen one overcooked bowl of pasta leave behind a smell that refused to die. It’s stubborn. Annoying. And honestly, a little embarrassing when guests walk into the kitchen.
If you’re searching for how to clean burnt microwave mess the right way, you’re not alone. Burnt food splatter, carbonized stains, lingering smoke odor, and greasy buildup can make your microwave look—and smell—like a disaster zone. The good news? You don’t need harsh chemicals or expensive cleaners. I’ll walk you through safe, effective methods using simple ingredients like vinegar, baking soda, lemon, and steam cleaning techniques. We’ll also talk about removing burnt smell, protecting the interior coating, and preventing it from happening again.
Let’s fix that microwave properly.
Why Burnt Residue in a Microwave Is So Hard to Remove
Burnt microwave stains aren’t like regular food splatters. When food overheats, sugars and proteins carbonize. They bond tightly to the microwave interior, especially on the ceiling and side walls. Once hardened, these residues act almost like glue.
Microwaves heat unevenly, which makes the problem worse. Hot spots cause certain areas of food to burn while others remain warm. The steam rises, splashes, and sticks. Then it dries. That’s how you end up with baked-on food particles that won’t wipe away with a simple damp cloth.
Another challenge is odor. Burnt smell seeps into the interior cavity and sometimes into the ventilation system. Even after wiping visible stains, the smoky smell can linger because microscopic particles remain. I’ve learned the hard way that surface cleaning alone doesn’t solve this problem—you need heat and moisture to loosen the bond.
Understanding this helps you approach cleaning strategically instead of scrubbing aggressively and damaging the enamel coating.
The Steam Cleaning Method (Vinegar or Lemon)

If there’s one technique I always recommend first, it’s steam cleaning. It softens hardened debris without scratching or stripping the microwave’s interior.
Start by filling a microwave-safe bowl with water and adding either white vinegar or freshly squeezed lemon juice. Place it inside and heat on high for five minutes. The goal isn’t just boiling—it’s creating steam that coats every interior surface. Once the timer ends, let the door remain closed for another five minutes. This trapped steam works magic.
When you open the door, you’ll notice condensation on the walls and ceiling. That moisture has loosened the burnt food residue. Use a microfiber cloth or soft sponge to wipe everything down. In most cases, the grime comes off effortlessly. If not, repeat the process.
Lemon helps neutralize burnt odor while vinegar cuts grease and disinfects naturally. I personally prefer lemon when the smell is strong—it leaves a fresh scent instead of a sharp acidic one.
Removing Stubborn Burnt Stains with Baking Soda

Sometimes steam isn’t enough, especially if the microwave has been neglected for weeks. That’s where baking soda comes in.
Create a thick paste using baking soda and a small amount of water. Apply it directly onto the burnt spots. Let it sit for at least 15 to 20 minutes. Baking soda works as a gentle abrasive, but more importantly, it breaks down carbon buildup without scratching the surface.
After the waiting period, wipe it away using a damp sponge. You’ll notice the stains lifting more easily. If needed, reapply and repeat. Avoid steel wool or harsh scrubbers. I’ve seen people permanently damage the microwave cavity by scratching the protective enamel coating. Once that coating is compromised, rust becomes a real issue.
Patience beats pressure here.
How to Get Rid of Burnt Microwave Smell
Even after the stains are gone, the burnt odor can linger. That’s because smoke particles settle deep inside the appliance.
One effective trick I’ve used is activated charcoal or a bowl of baking soda left inside overnight. Both absorb odor naturally. Another method is reheating a bowl of water with lemon slices and letting it sit for 10 minutes after heating.
If the smell persists, wipe down the door seal and check the turntable area. Food often hides underneath. Remove the glass tray and wash it separately with warm soapy water. I once found a burnt sauce drip under the roller ring that was causing the odor to return repeatedly.
Ventilation matters too. Leave the microwave door open for a while after cleaning to allow airflow. Fresh air speeds up odor elimination significantly.
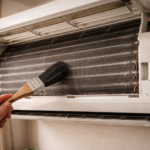
Cleaning the Microwave Ceiling and Hidden Areas
The microwave ceiling is usually the worst part. It’s directly above the food, where splatter hits first. Unfortunately, it’s also the hardest to scrub.
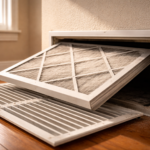
After steam cleaning, use a soft sponge with a small amount of dish soap. Gently wipe in circular motions. Don’t press hard. If grease filters are present (common in over-the-range models), remove and wash them according to the manufacturer’s instructions.
Pay attention to the waveguide cover—a small panel inside the microwave. Never soak it. Just wipe gently with a damp cloth. Excess moisture can damage internal components.
I always advise unplugging the microwave before deep cleaning. Safety first. Water and electronics don’t mix well.
What NOT to Use When Cleaning a Burnt Microwave
It’s tempting to reach for strong chemical cleaners, but that can cause more harm than good.
Avoid bleach, ammonia, or oven cleaner inside a microwave. These can damage the interior surface and leave toxic residue. Since microwaves heat food directly, chemical residue is not something you want lingering inside.
Never use metal scrubbers or sharp tools to scrape burnt food. Scratches weaken the enamel and lead to rust spots. Once rust starts, it spreads.
Also, don’t spray cleaner directly into ventilation openings. Liquids can seep into internal wiring. Always apply cleaning solution to a cloth first.
Keeping these mistakes in mind will protect your appliance long term.
How to Prevent Burnt Food in the Microwave
Prevention saves time and stress. I’ve learned a few simple habits that make a big difference.
Always cover food with a microwave-safe lid or splatter guard. This prevents food particles from sticking to the ceiling. Stir food halfway through heating to reduce hot spots. Uneven heating is one of the biggest causes of burning.
Adjust cooking time carefully. It’s better to heat in shorter intervals and check progress. And clean spills immediately. Fresh mess wipes away easily, while dried residue turns into hardened carbon.
Regular weekly wipe-downs keep buildup from forming. Think of it as maintenance instead of emergency repair.
Conclusion
Cleaning a burnt microwave doesn’t require harsh chemicals or aggressive scrubbing. Steam loosens hardened food residue. Baking soda tackles stubborn stains. Lemon and charcoal eliminate lingering odor. And careful maintenance prevents future disasters.
I’ve rescued microwaves that looked beyond saving using these simple techniques. The key is patience, moisture, and gentle cleaning methods. Protect the interior coating, remove hidden food debris, and let airflow finish the job.
Once you know how to clean burnt microwave mess properly, it becomes routine—not a crisis. And your kitchen smells fresh again!